
Showing posts with label valentines. Show all posts
Showing posts with label valentines. Show all posts
2.14.2012
valentines tradition
Here's a shot of our yearly tradition, originally talked about in this post. We've traded off filling this box of See's candy since 2005! The mr. took the turn this year. And even though you are expecting it; it still feels special.

2.11.2012
quick valentines
We are out the door for our weekend outdoor adventure... but I wanted to be sure to show you two easy valentine crafts you could whip up in no time!


Using old book pages, or scrap book paper of your choice either punch or cut out heart shapes. Simply double up the hearts and feed them through your sewing machine to your desired length! If you don't have a sewing machine, don't worry, just glue the string in between your two stacked hearts.


Using inspiration from family chic and a photo I found on Pinterest, I set out to the hardware store to find the materials they suggested. I wasn't impressed with the reinforced clothesline so I used some old floral wire I had at the house and wrapped it with yarn of my choice. Super simple, and really cute!


2.07.2012
heart ruffle wreath {tutorial}
I used this tutorial to make the ruffle wreath seen below. Nice and simple, made from white sheets I bought at a thrift store.


Take your 1/4 folded circle and hot glue it to the wreath. Continue this step until your wreath has reached your desired thickness.
Because the circle cutting is time consuming, I opted not to continue the ruffles around the back side of the wreath. I instead covered the back with a strip of fabric in the same t-shirt material.


Then a year later I repurposed the wreath for Christmas with a little upcyled ribbon. But I noticed a lot of the pins were coming out and causing the wreath to "thin".

When I sought out to make the heart ruffle wreath I vowed to skip the tedious pins and go straight to the hot glue gun... genius!

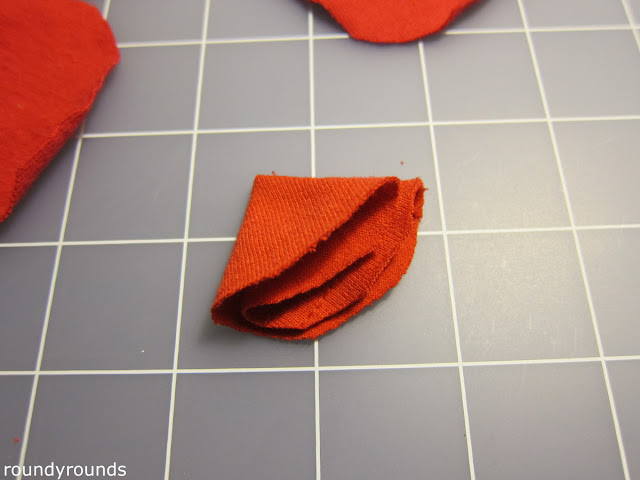
I started out with a straw heart wreath frame because I found it at a thrift store, but I am sure you could use a styrofoam one as well. Next step, cut out about a bazillion circles in the fabric of your choice. I used old t-shirts, and as you can see they weren't all the same shade of red. That doesn't matter as long as you mix the shades up so they aren't concentrated in one area of the wreath.

Fold your circle in half as seen here.

And in half again.

Take your 1/4 folded circle and hot glue it to the wreath. Continue this step until your wreath has reached your desired thickness.
Because the circle cutting is time consuming, I opted not to continue the ruffles around the back side of the wreath. I instead covered the back with a strip of fabric in the same t-shirt material.


1.23.2012
valentines sneak peak
I love when the mr. takes photos of my projects! I told him he makes my stuff look so nice and his sweet reply was they look nice to begin with. swoon.


Tutorials to come, plus many more valentines projects. I was just anxious to share!
2.12.2011
fabric heart garland
Oh {wo}man this was a difficult project! I'm really happy with the way it turned out however it was a beast to complete. As always I started with an inspiration photo...
Cute right? I was determined to use all upcycled fabric for the garland, so I set off to clean out my closets and craft supplies. I even asked a friend for any of her daughters clothes she was planning to donate because I knew they would have cute patterns. And in a last ditch effort not to buy new fabric, I stopped by a couple of thrift stores. Here's a pic of my fabric collection for the project.

Look at those thrift store prices for the fat quarters!

With the inspiration photo in hand I estimated the size of the muslin square (2.5"x 2.5"). I also noticed some squares held two hearts so I doubled the length for those. After that I created a heart shaped template with cardstock paper, traced the template onto my fabric and cut out my hearts.

In the first assembly attempt I thought I could cut corners by sewing straight down the middle of the heart or vertically down the square.

The single stitch plan didn't work very well; it was just too clumsy. So I decided to sew all of the muslin squares on first as you see below and then go back to sew the hearts on.

In the end there are 2 stitches on each square, one vertical and one horizontal.

And here's the final product! It took about 6 hours to complete this one strand and I hope to finish another to hang above this one.


Lessons learned:
 |
| bananasaurus rex |

Look at those thrift store prices for the fat quarters!

With the inspiration photo in hand I estimated the size of the muslin square (2.5"x 2.5"). I also noticed some squares held two hearts so I doubled the length for those. After that I created a heart shaped template with cardstock paper, traced the template onto my fabric and cut out my hearts.

In the first assembly attempt I thought I could cut corners by sewing straight down the middle of the heart or vertically down the square.

The single stitch plan didn't work very well; it was just too clumsy. So I decided to sew all of the muslin squares on first as you see below and then go back to sew the hearts on.

In the end there are 2 stitches on each square, one vertical and one horizontal.

And here's the final product! It took about 6 hours to complete this one strand and I hope to finish another to hang above this one.


Lessons learned:
- Muslin is not the best option for the base square. The weave of the fabric is too loose and the stringies were driving me nuts!
- Quilting fabric worked best for the hearts. The fabric from the upcyled cotton t-shirts wasn't stiff enough and those hearts tend to flop over.
- Use a much thicker string than I did. The crochet yarn I used kept twisting after the garland was assembled and it was a real pain.
2.10.2011
see's candies
The mr. and I have shared this box of See's Candies since 2005. Say what?

Each year we swap filling the same heart shaped box with a custom assortment of candies. This tradition was suggested to us by my Aunt Char who, when shopping for her own See's candies, witnessed an elderly lady filling a heart shaped box she had shared with her husband for years.

What's your Valentine's Day tradition? Here's some coupons if you are inspired to start a See's Candies tradition.
1.24.2011
valentines rag wreath
This wreath represents a personal victory; I bought just enough fabric to get the job done! I cannot tell you how many times I've bought too much fabric or had to return for more. So if you've been in either situation you must know how satisfied I am right now.

The process...
Google search {rag wreaths} and you will see there are many inspirations, methods and tutorials out there. I particularly enjoyed the tutorial on this blog because she used the same box wire wreath frame I used for the diaper wreath. If its not obvious by now I jump on any opportunity to repurpose an item!

I started with 3/8 yard of each fabric. There were 4 fabrics in this wreath: 2 polka dot, 1 stripped and 1 solid. I simply cut my fabric into 1.5" wide x 7" long strips. These dimension were decided by trial and error. Experiment with your dimensions to meet the size and desired fullness of your wreath.
After cutting the strips I simply tied them around the box wire wreath frame. No knot or double wrapping around the wire required. Here you can see the back of the wreath.

As simple as that!

Subscribe to:
Posts (Atom)